Carburetor: Dual-Feed Conversion
- Aug 6, 2015
Time: 1 hour (approximately)
Tools: socket set, flat-blade screwdriver, small putty knife or scraper, adjustable wrenches (optional).
Cost: (varied) approximately $100-$300
Tinware: center-hung float fuel bowls (if needed), metering block and hardware (sold as kit), metering jets, replacement gaskets, dual-inlet fuel line.
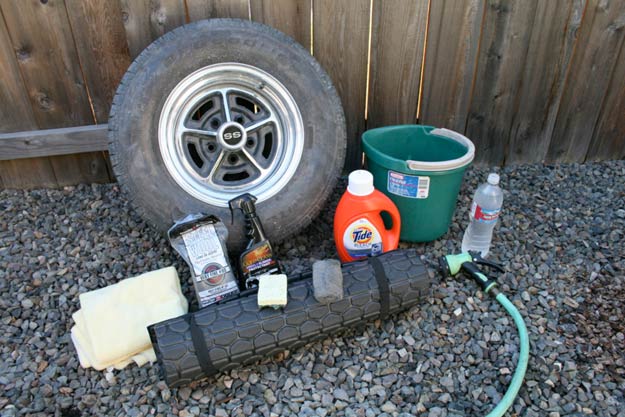
Tip: transfer the carburetor from the engine to a clean, open workbench. If you don’t have a carb stand, simply slide four bolts of your choice through the mounting holes in the bottom plate, and “nut” them up at the top. All you need is enough clearance for the levers and protruding linkage. (see photo #1)
Performance gains: increased fuel delivery and tuning accuracy.
Whether you’re working with an old factory Holley, or perhaps even a fresh, out-of-the box unit, making the switch to a dual guzzler can dramatically boost your carb’s performance. No, we am not talking about double-pumpers here. Although they may reign supreme at the track, some of us simply must work with what we have in our pockets at the time, or what has been reluctantly handed down over the years.
For most mild street applications, just about any standard 600 or 650cfm carb (model 4150 or 4160) should do the trick, and with minimal adjustment. They were engineered and built mainly for everyday economy and reliability with a little added performance on the side. True, not a bad route to go for the family truckster, but if you’re serious about maximizing your motor to its fullest potential, a definite change or upgrade must be made. Here are some reasons why…
First and foremost, let’s take a look at the float bowl. Most of the smaller 4160 models share the same design of a side-pivot float. Mounted to one inside wall of the fuel bowl, these floats fail to control the proper level and flow that is needed under hard cornering. Think about it. If centrifugal forces push the fuel inside the bowl away from the float, the leverage to close the inlet valve is naturally decreased. In turn, this allows more fuel to enter the bowl than is really needed. The same goes for a turn in the opposite direction as well. This time with an increase in leverage, the float is tricked to believe there is ample fuel present in the bowl– causing the inlet valve to close prematurely. Either way, it makes for a degraded performance.
In addition to whole “float” issue, these carbs are equipped with a somewhat problematic and restrictive fuel transfer tube. This small ¼” tube carries the fuel from the primary bowl down the side of the carburetor and into the secondary. On each end of the tube is an O-ring seal. Non-reusable and stubborn to properly reseat, these gaskets can make something as simple as a jet change a true test of patience. Needless to say, this is about the last thing we care to deal with at the track, or anywhere for that matter! There has to be better alternative.
Luckily, there are plenty of upgrade kits available from Holley for just about anything you might be running. The swaps are fast and relatively straightforward.
With that said, let’s get busy. We selected a stock 750cfm vacuum secondary Holley (model 3310) for the project. Factory equipped with dual, center-hung float fuel bowls, we were only in need of a secondary metering block and hardware (Holley p/n 3413) to complete the conversion. The smaller, pre-mentioned models would require the additional purchase of Holley p/n 34-2, which is a pair of dual inlet fuel bowls and their respective gaskets.

Start by removing the existing secondary fuel bowl (4 bolts). Be careful not to tear the small, circular gaskets behind the bolt heads, as these are prone to leakage if damaged.
In our case, we start by removing the rear fuel bowl to access the existing metering plate. If your carburetor still has gas in the bowl, grab a rag or a small “catch cap” to keep from spilling. Once the bowl is off, carefully unscrew the metering plate from the carb’s main body. There will most likely be some leftover gasket material still stuck on the mounting surface. If so, a small blade or scraping knife should do the job.
Please note: In the next two photos, we’ve used a different model Holley carburetor to illustrate the change-over. (The carb in these next two photos was already equipped with a dual-inlet fuel bowl).
<a href="/media/wp-content/ecklerscorvette/uploads/2015/08/shot2.jpg">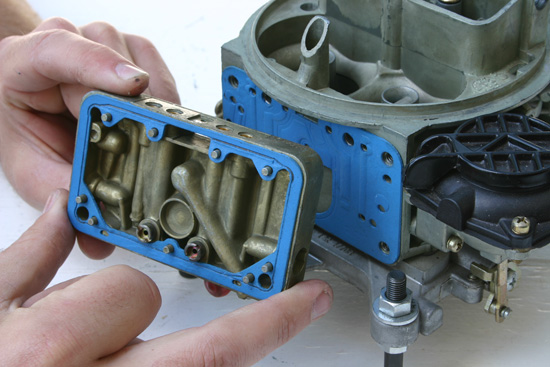
We strongly recommend Holley’s reusable, non-stick foam gaskets over the stock paper ones. Without the hassle of cleanup, it makes projects like this that much easier. Notice the secondary jets have already been placed in the block.
With the new gaskets already installed, the metering block and its jets follow suit and pop right into place. Similar to the front primary system, the addition of this block gives you total control of secondary delivery, and allows you to custom tailor it to your specific application and needs.
Using the supplied longer bolts, attach the dual-inlet fuel bowl onto the block housing. Be cautious not to over-tighten and risk the possibility of tearing or damaging the seals.
Tip: a good way to keep track of your jet sizes, either front or back, is to write the numbers in a washable marker on your fuel bowl for quick reference.
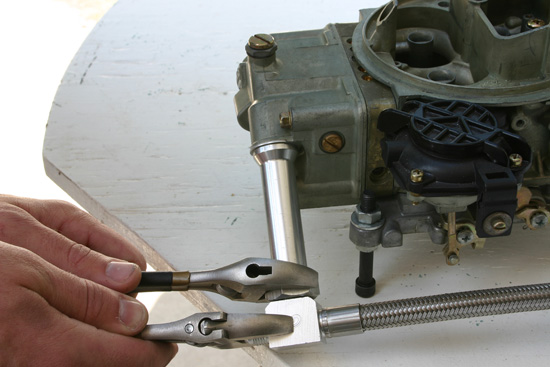
With everything back in its proper place, we now add the new, dual-inlet fuel line. Sure, braided stainless steel might be a little overkill for the low pressures this system will see, but we find it nice just knowing it’s there, and it looks great!
Now all that’s left is attaching the new fuel line. Regardless of the brand or style, all aftermarket fuel lines are pretty much the same in function, and are made to easily adapt and fit your specific carburetor.