Drum Brake Rebuild
- Sep 4, 2015
Drum Brake Rebuild
Time: 3 hours approximately (per pair)
Tools: lug-wrench, flat-blade screwdriver, rubber mallet, needle-nose pliers, various specialty brake tools (recommended)
Cost: rebuild kits approximately $250 for 4 wheel drum brakes
Tinware: brake shoes, drum brake hardware kit, other items may be necessary depending on the condition of your existing parts
Tip: When rebuilding your brakes, only disassemble one side at a time. The other side will serve as an accurate point of reference when putting all of the pieces back together.
Performance gains: Better brakes! Periodically replacing your shoes and rebuilding the brake assemblies will drastically increase your chances of ever seeing old age.
If you’re doing a bone-stock, back to specs factory rebuild, you’ll have the correct brakes to match, as many of yesteryear’s classics didn’t come with disc brakes.
Let’s face it. The braking system is the single most important set of components on your entire vehicle. Fortunately, the age-old design of drum braking still holds fast and true, even in the extremely high-tech world of today. Drums are often disregarded purely as safety hazards and marginal performers by street enthusiasts and racers alike. True, drum brake systems are not without their flaws and shortcomings. The stopping power and control issues of drums fail to meet up to the ever-increasing standard of their favored sibling– the disc. However, with the proper selection of quality parts and a little massaging, you can easily transform your factory binders into rock-solid performers.
The mechanical principals of drum brakes are fairly basic. The design consists of two brake shoes mounted on a stationary backing plate. The spring-mounted shoes are positioned inside the drum which rotates with the wheel assembly. This allows them to move toward the drums while braking, and still maintain proper alignment of the linings and the drums. At the top of the backing plate is the wheel cylinder. When the brakes are deployed, hydraulic pressure forces the actuating links of the wheel cylinder outward and against the top surface of the brake shoes. The tops of the shoes are then forced against the inner linings of the drums, causing the revolutions of the wheel to be slowed. When the pressure is released from the brake pedal, the return springs pull the shoes back away from the drums.
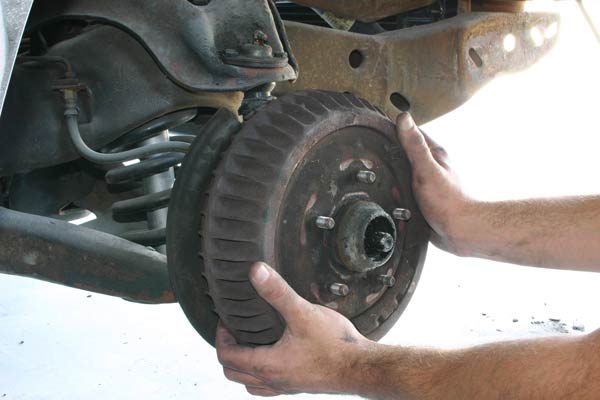
Once the tension has been released, along with the cotter pin and spindle nut, simply pull the drum from the hub assembly.
To access the drum and brake assemblies, you must first remove the wheel from the hub. Safely raise and support your vehicle with a floor-jack and some jackstands. Loosen the lug-nuts before lifting the tire off the ground. Once the wheel is removed, the drum is fully exposed and can easily be removed. Remove the cotter pin and spindle nut from the front of the hub assembly. It may be necessary to retract the adjuster on the backside of the drum. Remove the plug from the drum and turn the adjuster with a small flat-blade screwdriver. This will release any excess tension between the shoes and the inner linings of the drums. Using a rubber mallet, tap the rear edge of the drum forward over the wheel studs. The condition of each drum should be closely inspected for any cracks, scores, or grooves in the surface. If the unit is cracked, replace it. Deep scores and grooves can be handled by any automotive machine shop on a lathe. If the damage is minimal, try using some fine emery cloth to smooth out the roughness or burrs.
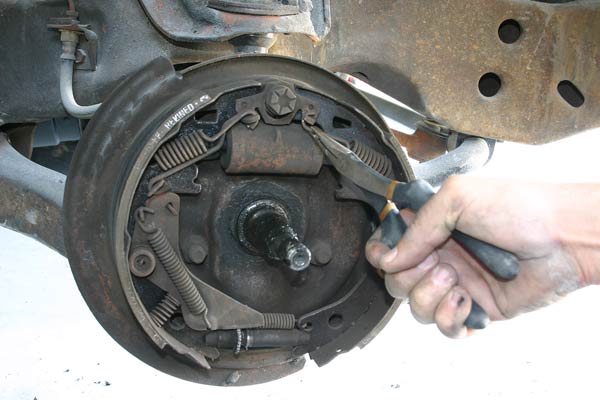
Although a spring puller is highly recommended, the job can be done with a set of needle-nose pliers. Watch out for busted knuckles!
Before digging into the mess, spray the shoes, springs, and hardware down with brake cleaner. Do NOT use compressed air! Brakes shoes contain cancer-causing asbestos. One at a time, remove the springs, screws, pins, and levers from the inner brake assembly. Specialty tools are readily available at any parts counter to help make this chore a little easier. I definitely recommend using them. When approaching the shoes, notice the different in size of the primary and secondary linings. The primary (leading) shoe has a shorter lining than the secondary (trailing) shoe and is mounted to the front of the wheel.
To remove the shoes, pull back on the secondary lining and disengage the parking brake strut and strut spring (rear drum brakes). Remove the shoe and disconnect the parking brake cable. By releasing the primary hold-down pin and spring, the leading shoe can now be extracted. Check the condition of the seals on the wheel cylinders for any leaks or cracks, and replace if necessary. The wheel bearings, wheel seals, and the hydraulic brake hoses should be inspected as well.
The reinstallation requires only a few special details. Lightly lubricate the backing plate contact points before positioning the new shoes. Also, be sure the right and left hand adjusting screws are not mixed up during the process. Focus on one side at a time, using the opposite side as a visual reference. When installed correctly, the star-wheel adjuster should be closest to the secondary shoe. When complete, properly adjust the drum brakes, and the parking brake.
In addition to the drums and brake shoes, rebuild kits are often sold and installed to enhance the performance of your tired drum brakes. These kits typically include all of the springs, screws, pins, and miscellaneous hardware needed for the job.
There is a great video on youtube.com on rebuilding drum brakes:
https://www.youtube.com/watch?v=MCpCkun2qxA