


Installing a New Intake Manifold
- Jan 2, 2015
Installing a new intake manifold
Tools: standard socket set, standard wrenches, flat-blade and/or Phillips screwdriver, putty knife or scraper, torque wrench
Tinware: aftermarket aluminum intake manifold, quality high performance intake gaskets, gasket sealer (silicone)
Tip: Before final installation, double check the fit of your parts to make sure everything lines up and will work with your existing application.
Performance gains: a cooler, higher-flowing intake charge, and, aluminum manifolds typically result in about a 25 pound weight loss
Swapping on an aftermarket aluminum intake manifold is one of the most popular engine upgrades of all time. It’s easy, it’s cheap, and the bottom line is, it works! Not only does aluminum dissipate heat faster and more efficiently than cast iron, but it will also save you about 25 lbs. in dead weight! The new aftermarket manifolds have an improved plenum design and will far outflow a factory cast-iron piece. In fact, most are dyno-tested and proven to yield encouraging power and torque increases throughout your entire powerband. Now how can you beat that for a couple hundred bucks?
With any manifold swap, the first order of business is to remove all the attaching components such as the carburetor, distributor, and the thermostat and housing (note: be sure to fully drain the cooling system before disconnecting the upper radiator hose).
Working in a criss-cross type fashion, loosen and remove all the bolts securing the manifold to the engine block. The number of bolts may vary depending on the size and make of your motor. Using a long screwdriver or pry bar, gently lift up on the edges of the manifold. A little leverage is all it should take to break the bond between the two pieces. You may need to unbolt the valve covers for adequate clearance and to keep from damaging them when prying the manifold up.
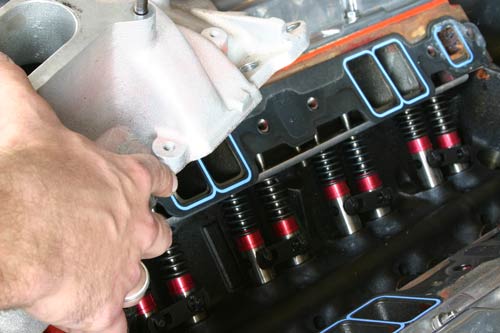
Now it’s time for the cleanup. Before removing the old gaskets and silicone, lay a clean towel into the lifter valley to avoid any debris or contaminants from entering the motor. Use rags to plug up the intake ports in the cylinder heads as well. With a small putty knife or scraper, remove all old gasket material from the mating surfaces of the head and the block. Follow up by thoroughly wiping down the areas with any industrial type stripper or cleaner. This is a crucial step to ensure a lasting, leak-free seal. All bolt holes should be inspected and properly cleaned out with a tap if needed.

To bridge the gap between various intake gaskets, lay down a thick, even bead of sealer across the block. Don’t go overboard here. If too much is applied, the excess may fall down inside the lifter valley when compressed.
When installing, first lay a thin coat of gasket sealer to the backsides of the manifold gaskets and place them on the cylinder heads. This will keep them from walking around and possibly sliding out of position when dropping the manifold into place. Using quality oil-resistant silicone, lay a thick bead of sealer across the front and back of the engine block. Most intake manifold gasket kits include formed rubber end seals for this purpose. However, they are terrible at sealing the manifold and should be immediately discarded. Be careful not to lay on too much silicone in any one area. When the manifold is installed and tightened down, the excess sealer can easily fall down inside the lifter valley and harden. Needless to say, this can lead to serious blockage and interference problems in the engine block.
With the intake gaskets slightly tacked in place, carefully lower the manifold into position.
With the gaskets and sealer in place, carefully lower the manifold into position. Apply a fair amount of thread sealer to the intake bolts and snug them down by hand. Depending on manifold selection, it may be necessary to purchase a longer set of mounting bolts. We recommend using ARP’s line of stainless steel bolts and hardware for just about any job. They are strong, durable, and provide the perfect finishing touch for any fresh engine rebuild.
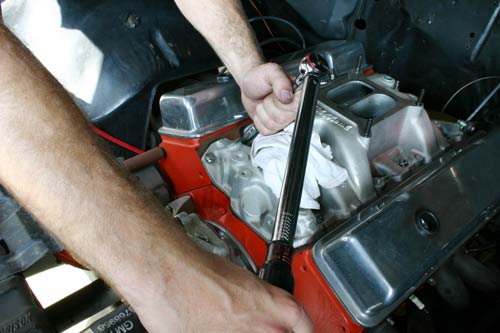
All manifolds should be properly torqued down to manufacturer’s specs. Keep in mind this will change depending on the material used– cast iron vs. aluminum.
Last but definitely not least is the final tightening of the manifold bolts. Using a standard lbs-ft torque wrench, start at the center of the intake and work your to each end in a cross pattern. To prevent warping or possibly cracking the manifold, work in gradual steps with the torque wrench. For example, if your final torque specification is 20 lbs-ft, torque all of the bolts first to 10 lbs-ft, then 15 lbs-ft, and finally 20 lbs-ft. It’s a good idea to check them once more after running the car and allowing the manifold to heat up.


