


Project Car: 57' 210 Chevy
- Oct 4, 2013
Owner: Jim Schultz, Swedesboro, NJ
Story
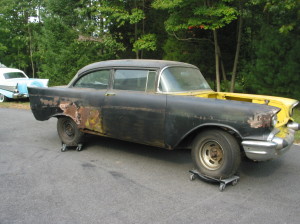 I bought this ’57, 210 2-door sedan about 15 years ago for $500. Originally a 283 power pack 3-speed car, it had been converted into a race car. While loading the car on the trailer, I noticed it was equipped with a Dana 60 4.11 posi rear, sweetening the deal. I remember “Hot Rod Magazine” around 1974 built a similar ’57 210 2-door sedan drag car that used a Dana 60. I stored (more like buried) the car in my storage building, while I finished other ’57 projects, until about 2 years ago when I started the restomodification.
I have an original 270 HP ’57 Convertible, a high point ‘57 Sedan Delivery, and an original 12K mile ’68 SS 427 Impala, 425HP 4.10 posi, none of which are comfortable drivers. My aim with this car is to make a driver.
The passenger side quarter panel had old collision damage in front of the wheel well. Damage to the front wheelhouse had not been straightened, and road debris had infiltrated the quarter and rocker panel, causing extensive rust. The driver side rocker panel had also been hit, deforming the front brace and driver floor pan. At some point, a tire had shredded in the driver side wheel well, which was also beginning to show the inside rust at the wheelhouse seal. Bel Air inserts had been installed on the quarters which led to heavy surface rust beneath the missing side stainless. The tailpan was fortunately very solid, although a side floor section of trunk needed a patch since a hole was drilled for a rear antenna and water collected there. The usual rust coming up the wheelwell/trunk inside was also present.
 My focus on this project to date is on body and paint, and I hope that I can give pointers to people starting out on a project like this. I ordered best quality front ¼ sections, outer rockers, inner rockers, and front floor braces. I metal prepped them and primed with DuPont “Prime-N-Seal” epoxy primer which is also a weld through primer. With the body on the frame and doors adjusted, I replaced the inner and outer rockers and front ¼ section. The panels were butt welded with a mig in short sections since it takes less heat; an overlapped joint promotes rust between the two pieces of metal. To keep the wheel opening correct, I used an old fender skirt to maintain alignment. The patch took care of the rust but didn’t completely cover the metal damage to the panel. I was able to get it straight with no “oil can” by using the shrinking tip of a “Stinger” studweld gun. Numerous shrinks (over 100) were required to take out all the warpage from the previous repair. I used a 4 foot level as a straight edge to locate high and low spots. The work was repeated on the driver side.
I fixed the usual rust on the bottom of the front fenders, but when I installed a headlight bezel and bucket, it wouldn’t fit. The fender had been deformed enough in this area that I had to replace it with another, and another patch panel was ordered. The floor sections and braces were installed. The curvature of the crown from the scrap fender makes an acceptable patch for the (always cut too big) 4 speed hole in the tunnel. A bolt running up the center of the hole from the frame to the floor pan through the brace assures the body will align back on the frame.
With the quarters roughed in, I paint stripped the doors and found rust in the door bottoms and skin corners. I unfolded the bottom skin and used the skin as a template to replace the inner bottom. Then I removed the outer skin and blasted and epoxy primed the entire door. Finally, with the reworked fenders on and adjusted, the new skins were fitted to the door frame and adjusted to fit the opening all around. The doors were installed and removed countless times, and to make alignment easier, I drilled an 1/8 in hole through the rebuilt hinges and doors where they would be hidden by the trim pad to readily locate the correct alignment position.
The quarters were then carefully sandblasted at low pressure at an angle so that the metal would not warp, sealed with POR-15, dusted with epoxy, scuffed, then sealed with “Prime and Seal”. All plastic work is over epoxy primer, and since epoxies do not allow moisture through to the metal, rust doesn’t spread under the filler. The plastic is then resealed with epoxy; plastic filler is never wet sanded since it can trap moisture. Urethane primer filler like DuPont “URO FIL” is primed and blocked, dry then wet, until the panels are straight.
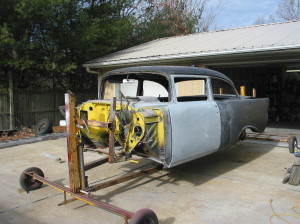
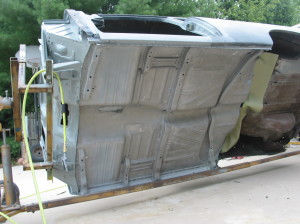 The car is now on a rotisserie, completely sandblasted and primed inside and out, waiting on final body work and trial refit to a new, different frame. The original frame from the car had too many extra brackets stick welded through the years, ladder bars, etc, and was twisted at the front (the Dana 60 was not there just for the cool factor).
To finish this car I bought a TPI LT-1 350 and I was lucky enough to win the Tremec transmission at Super Chevy Maple Grove in 2009. It looks like I’ll have to remove the repaired tunnel section for trans clearance. I haven’t decided on a color yet, the original color is black. I think the car may have too many reworked panels to be black and since it will be a summer driver I am leaning towards a lighter color. The car will have A/C, front discs, power steering but look vintage 60’s on the outside.


