Oil Pump and Pan Installation
- Mar 11, 2016
Oil Pump and Pan Installation
Tools: standard socket set, standard wrenches, long screwdriver or pry bar, gasket scraper
Cost: approximately $50 for pump, $50-$250 for pan
Tinware: pan and pump, oil pan gasket, gasket sealer
Tip: When working with an engine on a stand, make sure it’s on a flat level surface and the rotation lock pin is in place.
Performance gains: Swapping on a high-volume oil pump and an aftermarket pan can produce up to a 10-15 hp gain on some engines.
Camaro Oil Pumps
A mere afterthought to most, the lower oiling system is crucial to the strength and longevity of any high performance motor. The components collectively work together as a team. The oil pump in particular, is responsible for providing adequate lubrication to all moving parts inside the motor as well as maintaining consistent pressures throughout its operating range. If any one part in the system fails, the results can be catastrophic. Here, we’ll cover oil pump and pan installation.
If your engine is already out of the car and on a stand, this job is going to be 100% easier than getting under the car and draining the oil, removing the pan, etc. Here, we have motor out of the chassis and mounted on a 360-degree engine stand. Now we can easily turn the motor upside down and access the pan and pump. Make sure you completely drain the motor of all engine oil from both the crankcase and the filter. The cooling system should be dry as well. With the motor rotated 180-degrees and secured in place with the engine stand lock pin, unbolt the oil pan from the block. It may need a little help from a rubber mallet or pry bar to un-stick the two surfaces. Remove the pan and set it aside, along with the hardware.
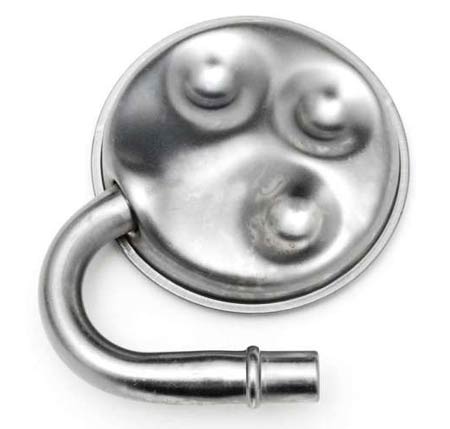
Removal of the oil pump
At this point, the oil pump is right on top and ready for removal. Unbolt the pump at the base where it mounts to the rear main bearing cap. There may be dowels in the cap to locate and secure the pump (see arrows photo 2). The pump should disengage from the driveshaft and lift clean off. Remove the driveshaft and inspect for any unusual wearing or damage.
To remove the oil pump, loosen the bolt that connects the pump base to the rear main bearing cap.
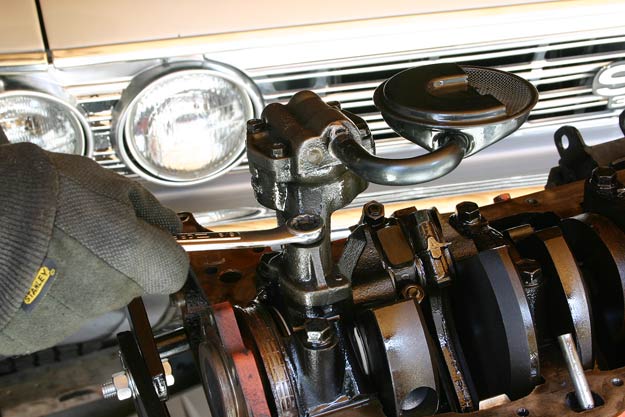
The new pump will install in the same fashion. Be sure the upper end of the extension shaft is fully mated to the lower end of the distributor driveshaft when reassembling. The oil pump must align with the tang on the lower end of the extension shaft as well (see photo 2). Once the new pump is in place, tighten the mounting bolt to the proper spec.

Be sure to align the pump to the inner tang on the shaft when reassembling.
Before reinstalling the pan, clean the mating surface of the block with a gasket scraper and some engine degreaser. Oil leaks (commonly from the pan) can make your driveway a mess, not to mention drive you crazy! Make sure everything is clean and dry before applying the new gasket. The heavy-duty, one-piece oil pan gaskets work great if you can find one for your application. If not, take your time and use a quality gasket sealer to help with the bridge seals and in the corners.
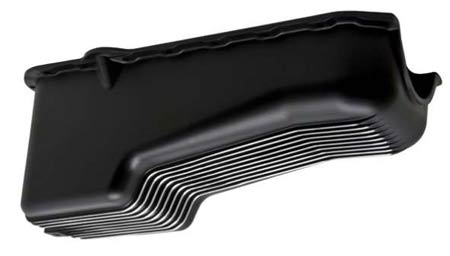
Camaro Oil Pans
And so this brings us back to the pan. Contrary to some, all oil pans are not created equal. Most factory-style pans are thin stamped steel that often distort or warp from tightening or over tightening the oil pan bolts. They are somewhat limited on oil capacity, too. If you run a serious, high performance engine, you might want to consider an aftermarket deep sump pan with internal baffling and a screened windage tray. These designs offer rapid oil return to the sump without the power-robbing “splash-back” effect. Often times, the lower rotating assembly will sling the oil against the solid, factory-style tray, and cause the oil to bounce back into the moving parts– ultimately losing power. These pans are not exactly cheap, but well worth the extra insurance and horsepower!
Reinstall the pan and tighten the bolts down evenly in stages.
Shop for Tri-5 Chevy parts at www.ClassicChevy.com
Follow us on our Tri-5 Facebook page. Click here and Like us!